Create PVCs
Objective
This guide provides instructions on how to create and manage Persistent Volume Claim (PVC) for applications running on F5® Distributed Cloud Services vK8s deployments. A PVC provides access to storage resources whose lifecycle is independent of the lifecycle of pods and the applications.
Kubernetes supports the provisioning and consumption of storage resources called Persistent Volumes (PV) by means of storage classes. The PVC is used by pods to consume the PVs. For more information on PVCs and PVs, see Persistent Volumes.
Note: In the case of multi-node CE sites and RE sites, the PVs (Persistent Volumes) are not replicated across nodes. Therefore, if a node fails, the data in the PV is lost. However, applications like Cassandra may not be affected by this since they support replication at the application level.
The following image shows the operational view of PV creation and consumption using a PVC.
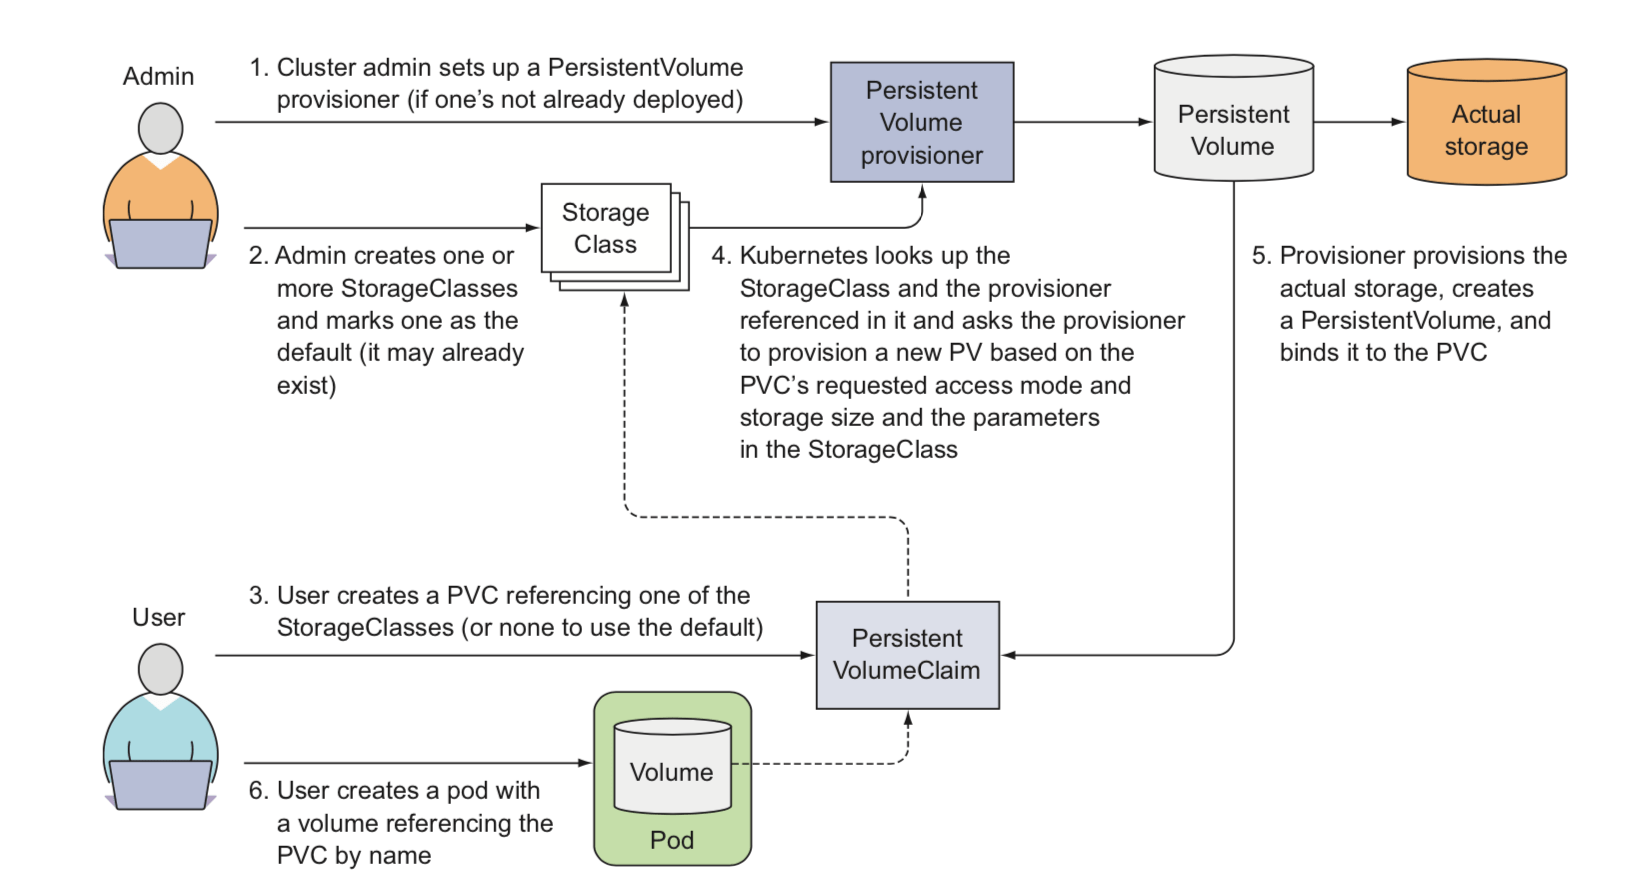
Figure: PVC Operational View
Using the instructions provided in this guide, you can create and manage a PVC for an application deployed using the F5® Distributed Cloud Console.
Note: For an application to consume storage resources, it needs to be provisioned by the cluster administrator.
Prerequisites
The following prerequisites apply:
- A valid Account is required.
- Note: If you do not have an account, see Create an Account.
- An application deployed using F5 vK8s.
- Note: See vK8s Deployment guide to deploy your applications on F5 edge cloud.
Configuration
You can create a PVC and use it in your application deployment using one of the following methods:
-
Create a PVC and add it to your deployment in the F5 Console.
-
Download the kubeconfig of your vK8s deployment from the F5 Console and use kubectl to apply PVC and deployment.
Note: In both methods, it is required that first you create vK8s in the F5 Console.
Configuration Sequence
Creating PVC and using it in the deployment requires you to perform the following sequence of actions.
| Phase | Description |
|---|---|
| Create PVC | Create a PVC object specifying the storage requirement and access mode. |
| Create Deployment | Create a vK8s deployment applying the PVC. |
Note: You can also update an existing deployment to use a created PVC.
Create PVC and Deployment in F5 Distributed Cloud
Features can be viewed, and managed in multiple services.
This example shows PVCs setup in Distributed Apps.
Step 1: Open F5 Distributed Cloud Console, open PVC.
- Open
F5® Distributed Cloud Console> selectDistributed Appsbox.
Note: Homepage is role based, and your homepage may look different due to your role customization. Select
All workspacesdrop-down menu to discover all options. Customize Settings:Administration>Personal Management>My Account>Edit work domain & skillsbutton >Advancedbox > checkWork Domainboxes >Save changesbutton.
Figure: Homepage
- Select the
Namespacedrop-down where your vK8s object is created underDistributed Apps.
Note: Confirm
Namespacefeature is in correct namespace, drop-down selector located in upper-left corner. Not available in all services.
- Select
Applicationsin left-menu > selectVirtual K8s.
Note: If options are not showing available, select
Showlink inAdvanced nav options visiblein bottom left corner. If needed, selectHideto minimize options from Advanced nav options mode.
-
Select
Namelink inVirtual K8sto open dashboard. -
Select
PVCs. -
Select
+ Add Persistant Volume Claimbutton.
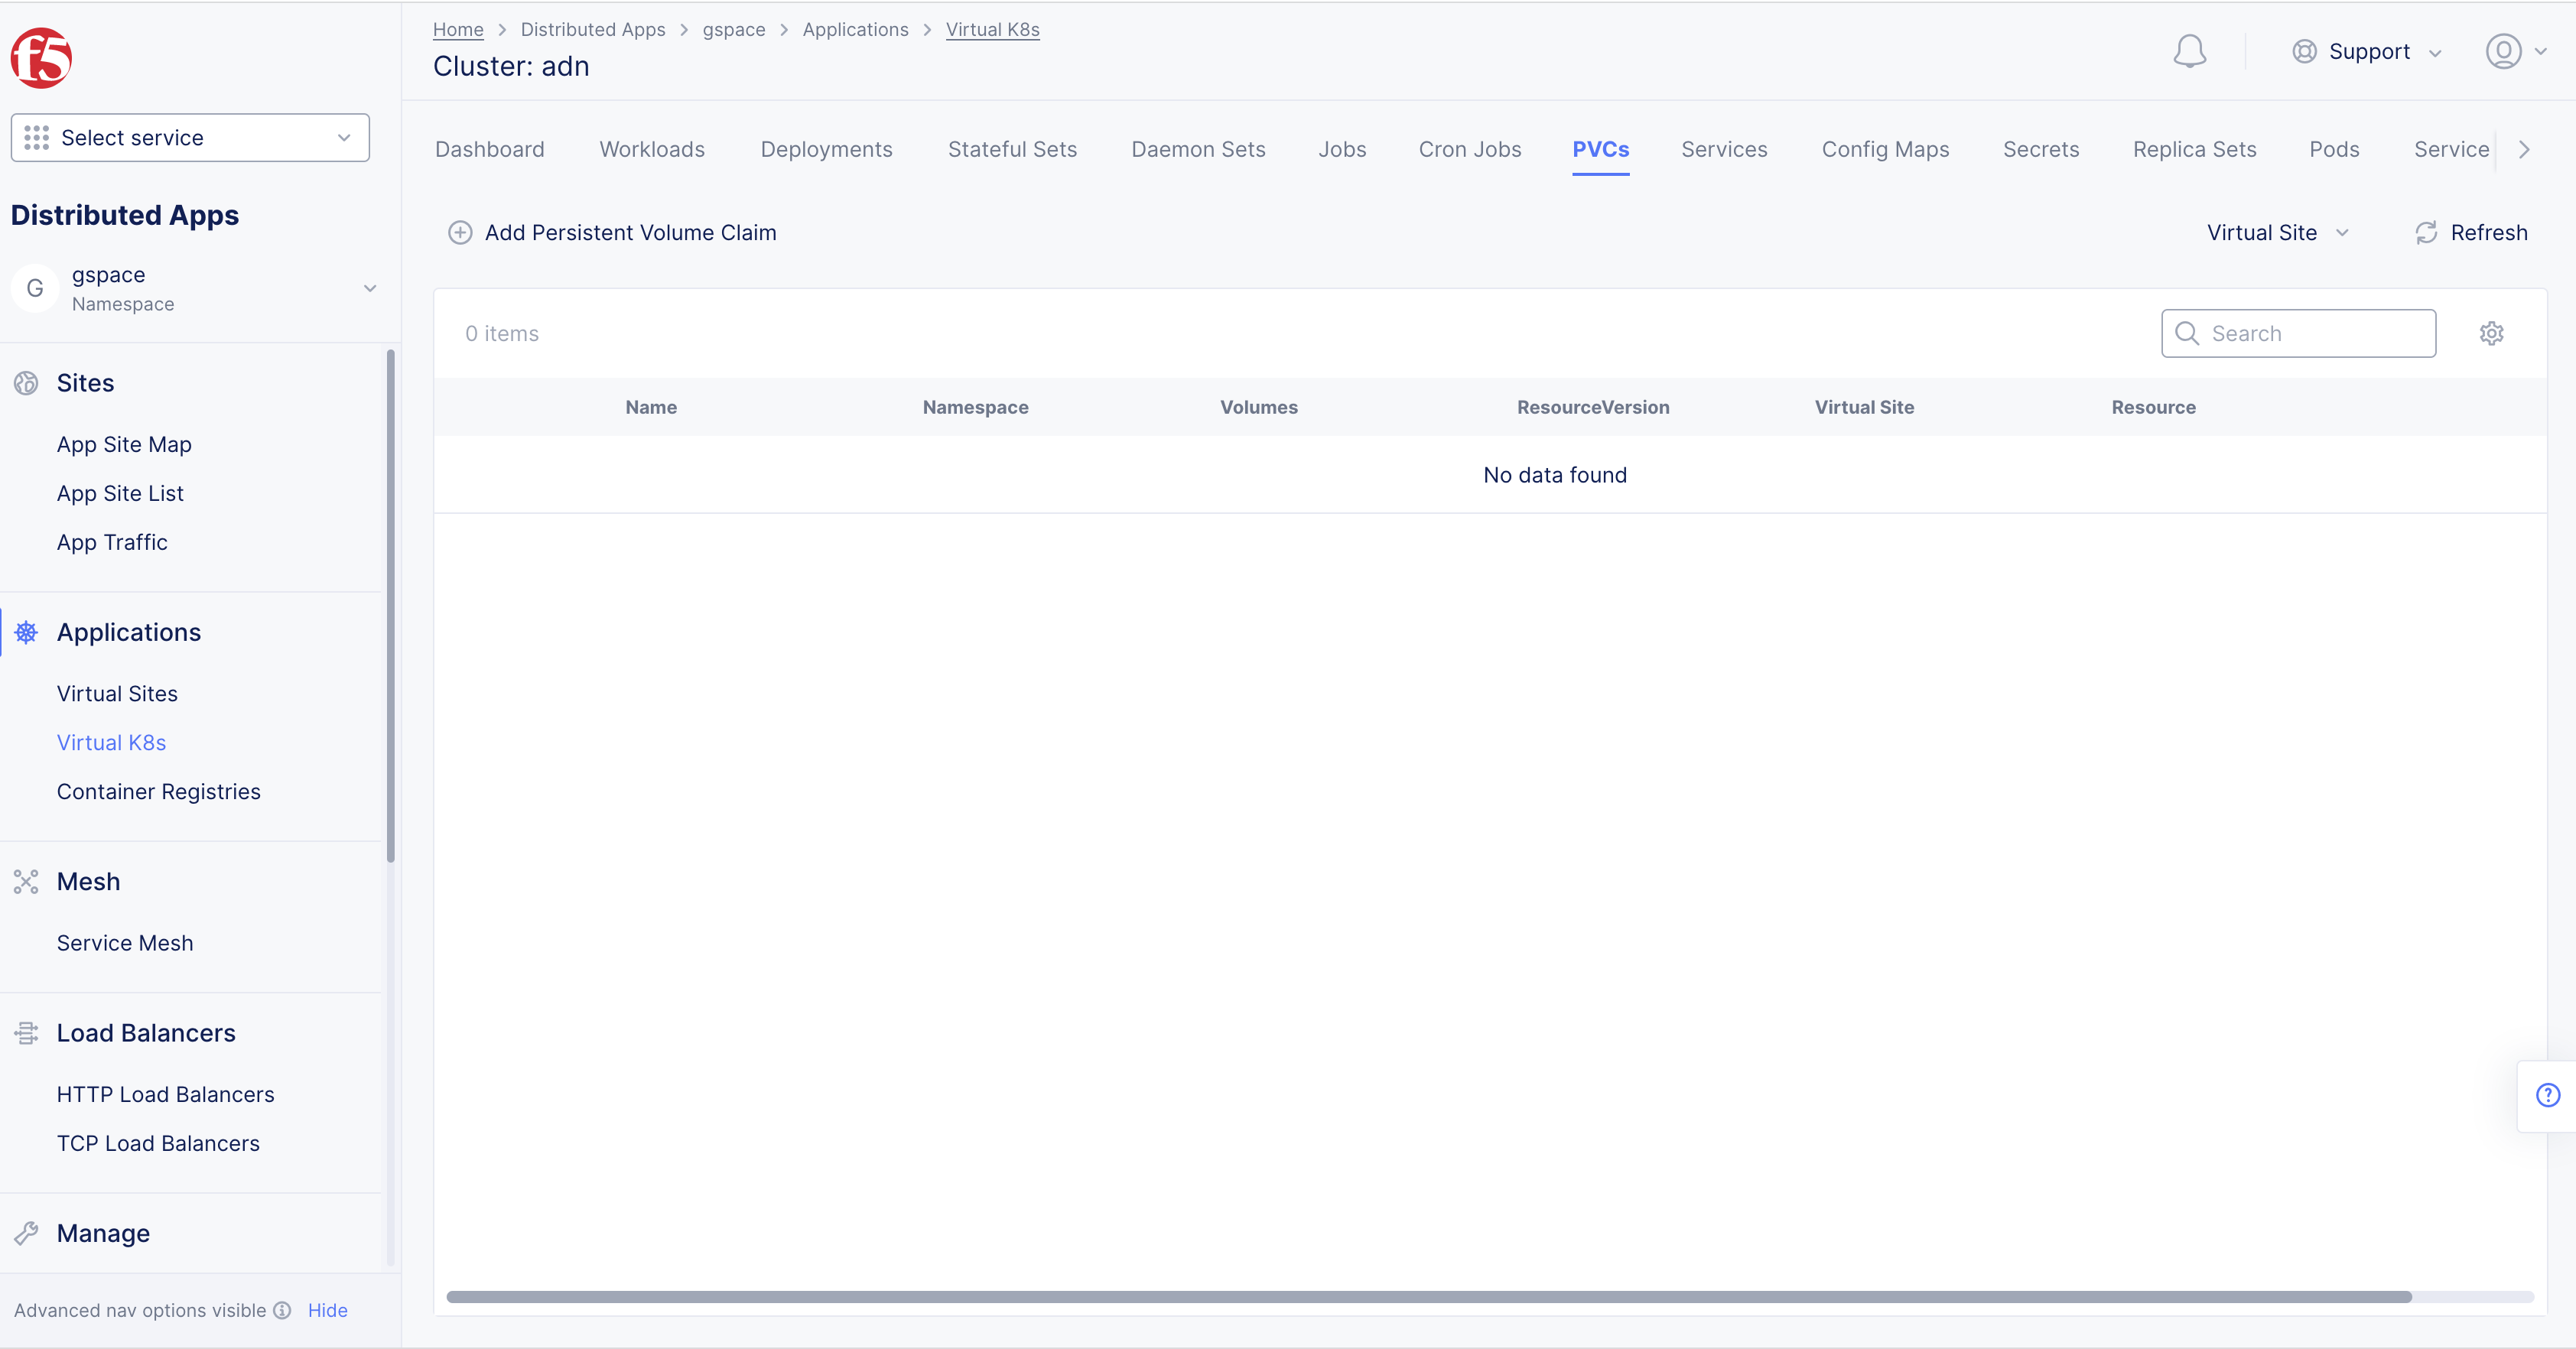
Figure: User Management
Note: In case vK8s object is not already created, the
Add virtual K8soption will be available to create vK8s. See vK8s Deployment guides for more information.
Step 2: Enter PVC configuration in JSON or YAML format.
-
Select
YAMLorJSONin drop-down menu. -
Toggle
Edit Modeon. -
Enter PVC configuration in text area.
This example shows a sample application configuration.
Note: You will need to change the sample image name mentioned in the template manifest to the correct image name.
Note: You will need to change the sample image name mentioned in the template manifest to the correct image name.
apiVersion: v1kind: PersistentVolumeClaimmetadata: name: pvc-sample-app *# The name of your claim—you’ll need this later when using the claim as the pod’s volume.* namespace: vk8s-pvcspec: accessModes: - ReadWriteOnce *# You want the storage to support a singleclient (performing both reads and writes)* resources: requests: storage: 100Mi *# Requesting 100M of storage* volumeMode: FilesystemStep 3: Create PVC object.
- Select
Savebutton.
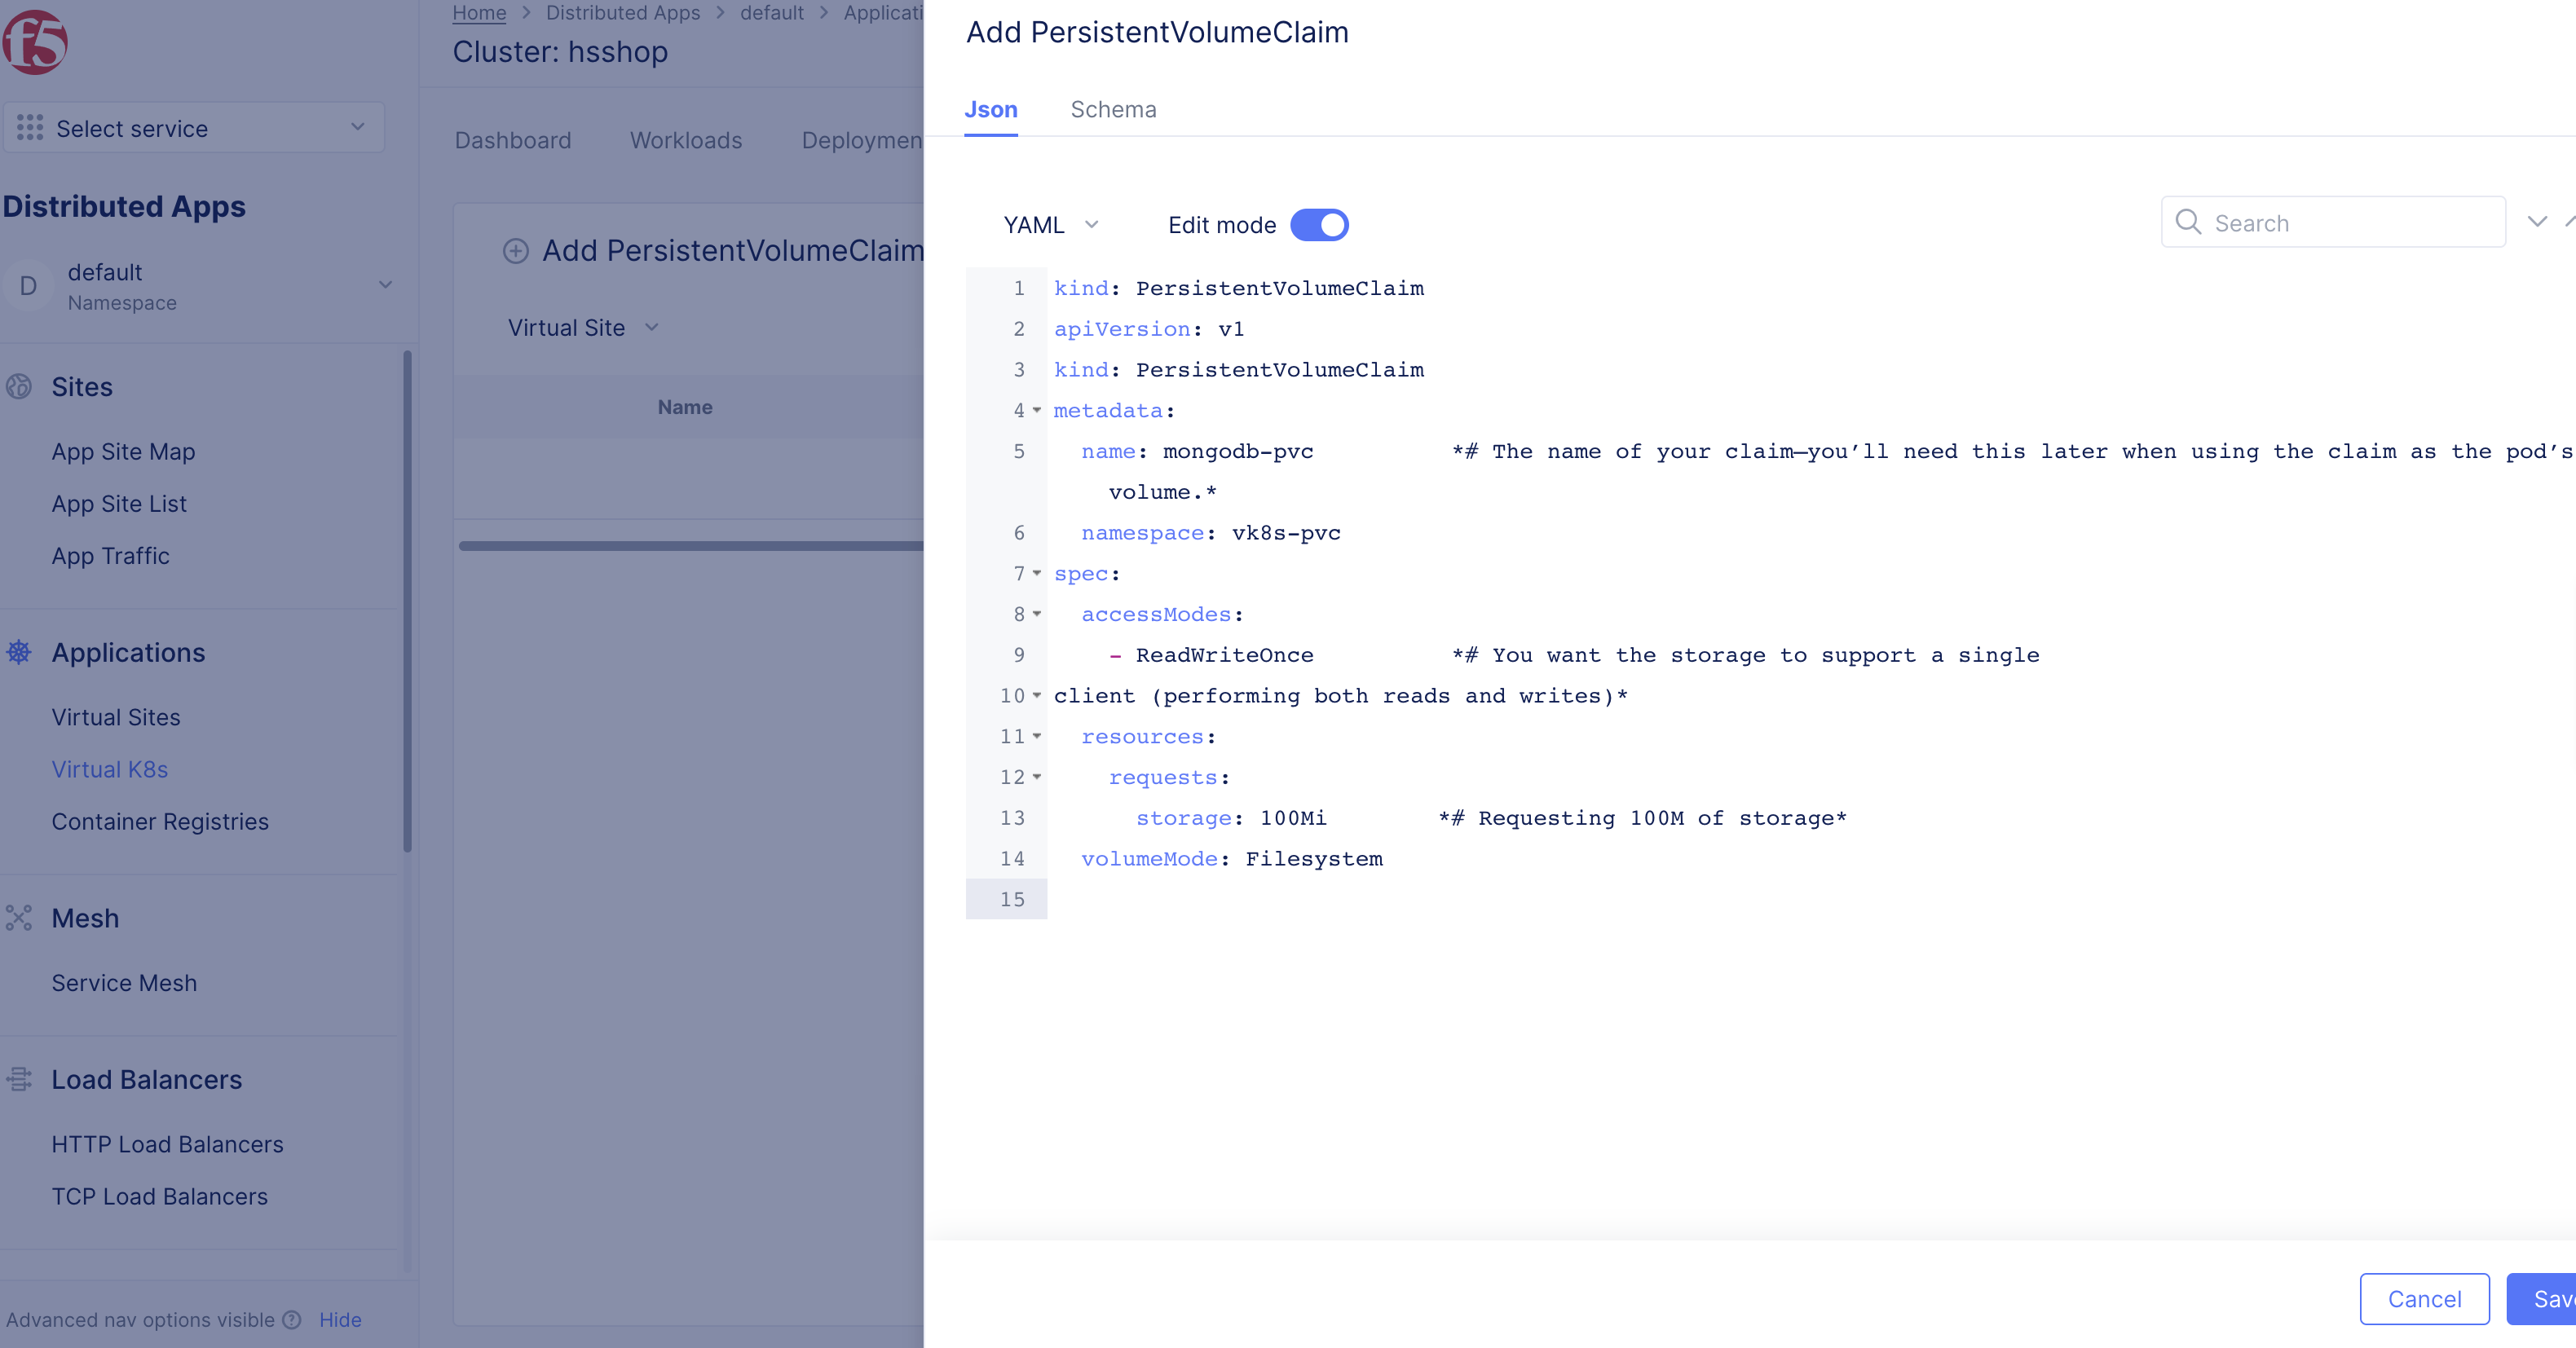
Figure: Create PVC in the F5 Console
Step 4: Add Deployment.
-
Select
Deploymentstab. -
Select
+ Add Deploymentsto load deployment creation form.
Note: You can also edit an existing deployment by selecting the
...>Editoption against that deployment.
Step 5: Setup Deployment
Enter deployment configuration referencing PVC created in Step 6.
-
Select
YAMLorJSONin drop-down menu. -
Toggle
Edit Modeon. -
Enter configuration in
kind: Deploymenttext area. -
Select
Savebutton to create deployment.
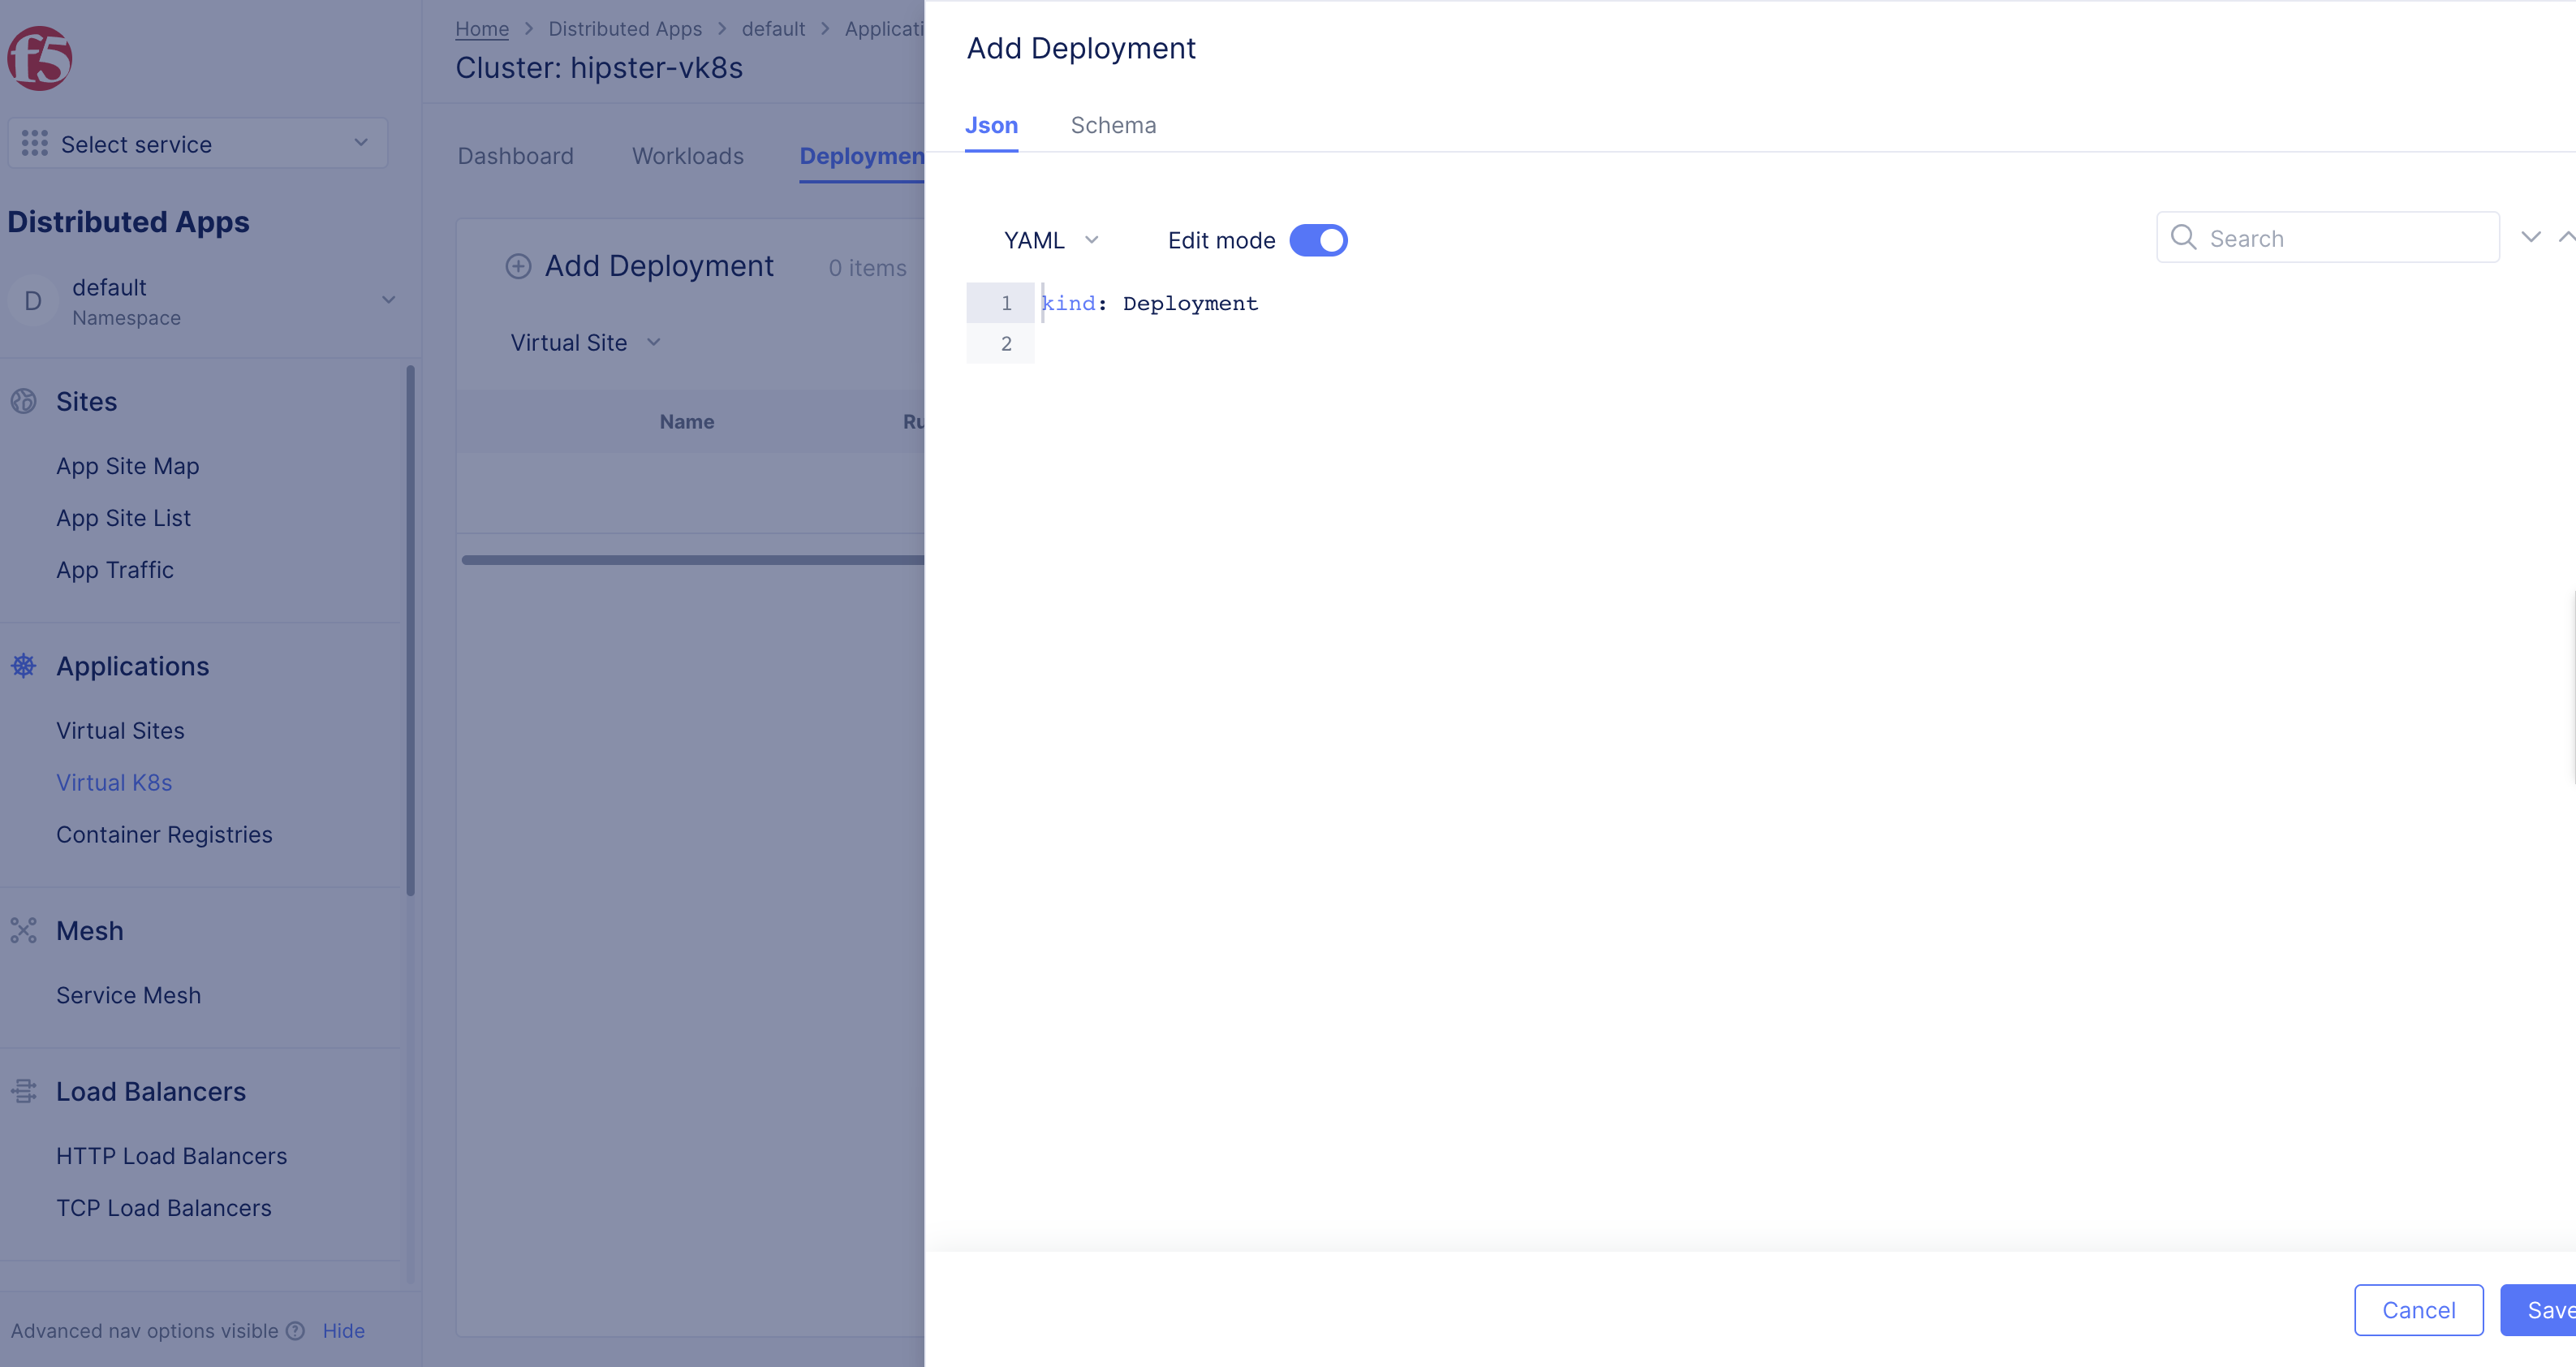
Figure: Create PVC in F5 Console
Note: The
persistentVolumeClaimsection of the deployment configuration references the PVC in theclaimNamefield. Ensure you specify the appropriate PVC object name. For this example, the name of PVC object created in Step 6 is used.
Create PVC and Deployment Using Kubectl
Step 1: Open F5 Distributed Cloud Console, open VK8s namespace.
-
Open
F5® Distributed Cloud Console, selectDistributed Appsbox. -
Select the
Namespacedrop-down where your vK8s object is created underDistributed Apps.
Step 2: Open VK8s.
Select Applications from the configuration menu, and Virtual K8s from the options pane.
-
Select
Applications>Virtual K8s. -
The vK8s object is displayed in the list.
Note: In case vK8s object is not already created, the
Add virtual K8soption will be available to create vK8s. See vK8s Deployment guides for more information.
Step 3: Download Kubeconfig file for vK8s object.
- Select
...onVirtual K8s> selectKubeconfigto download file.
Note: Save file to your desktop.
-
Select date in drop-down menu in
Please select credential expiry datepop-up window. -
Select
Download Credentialbutton.
Note:
Download is being preparedpop-up window will appear in bottom-right initiating file download.
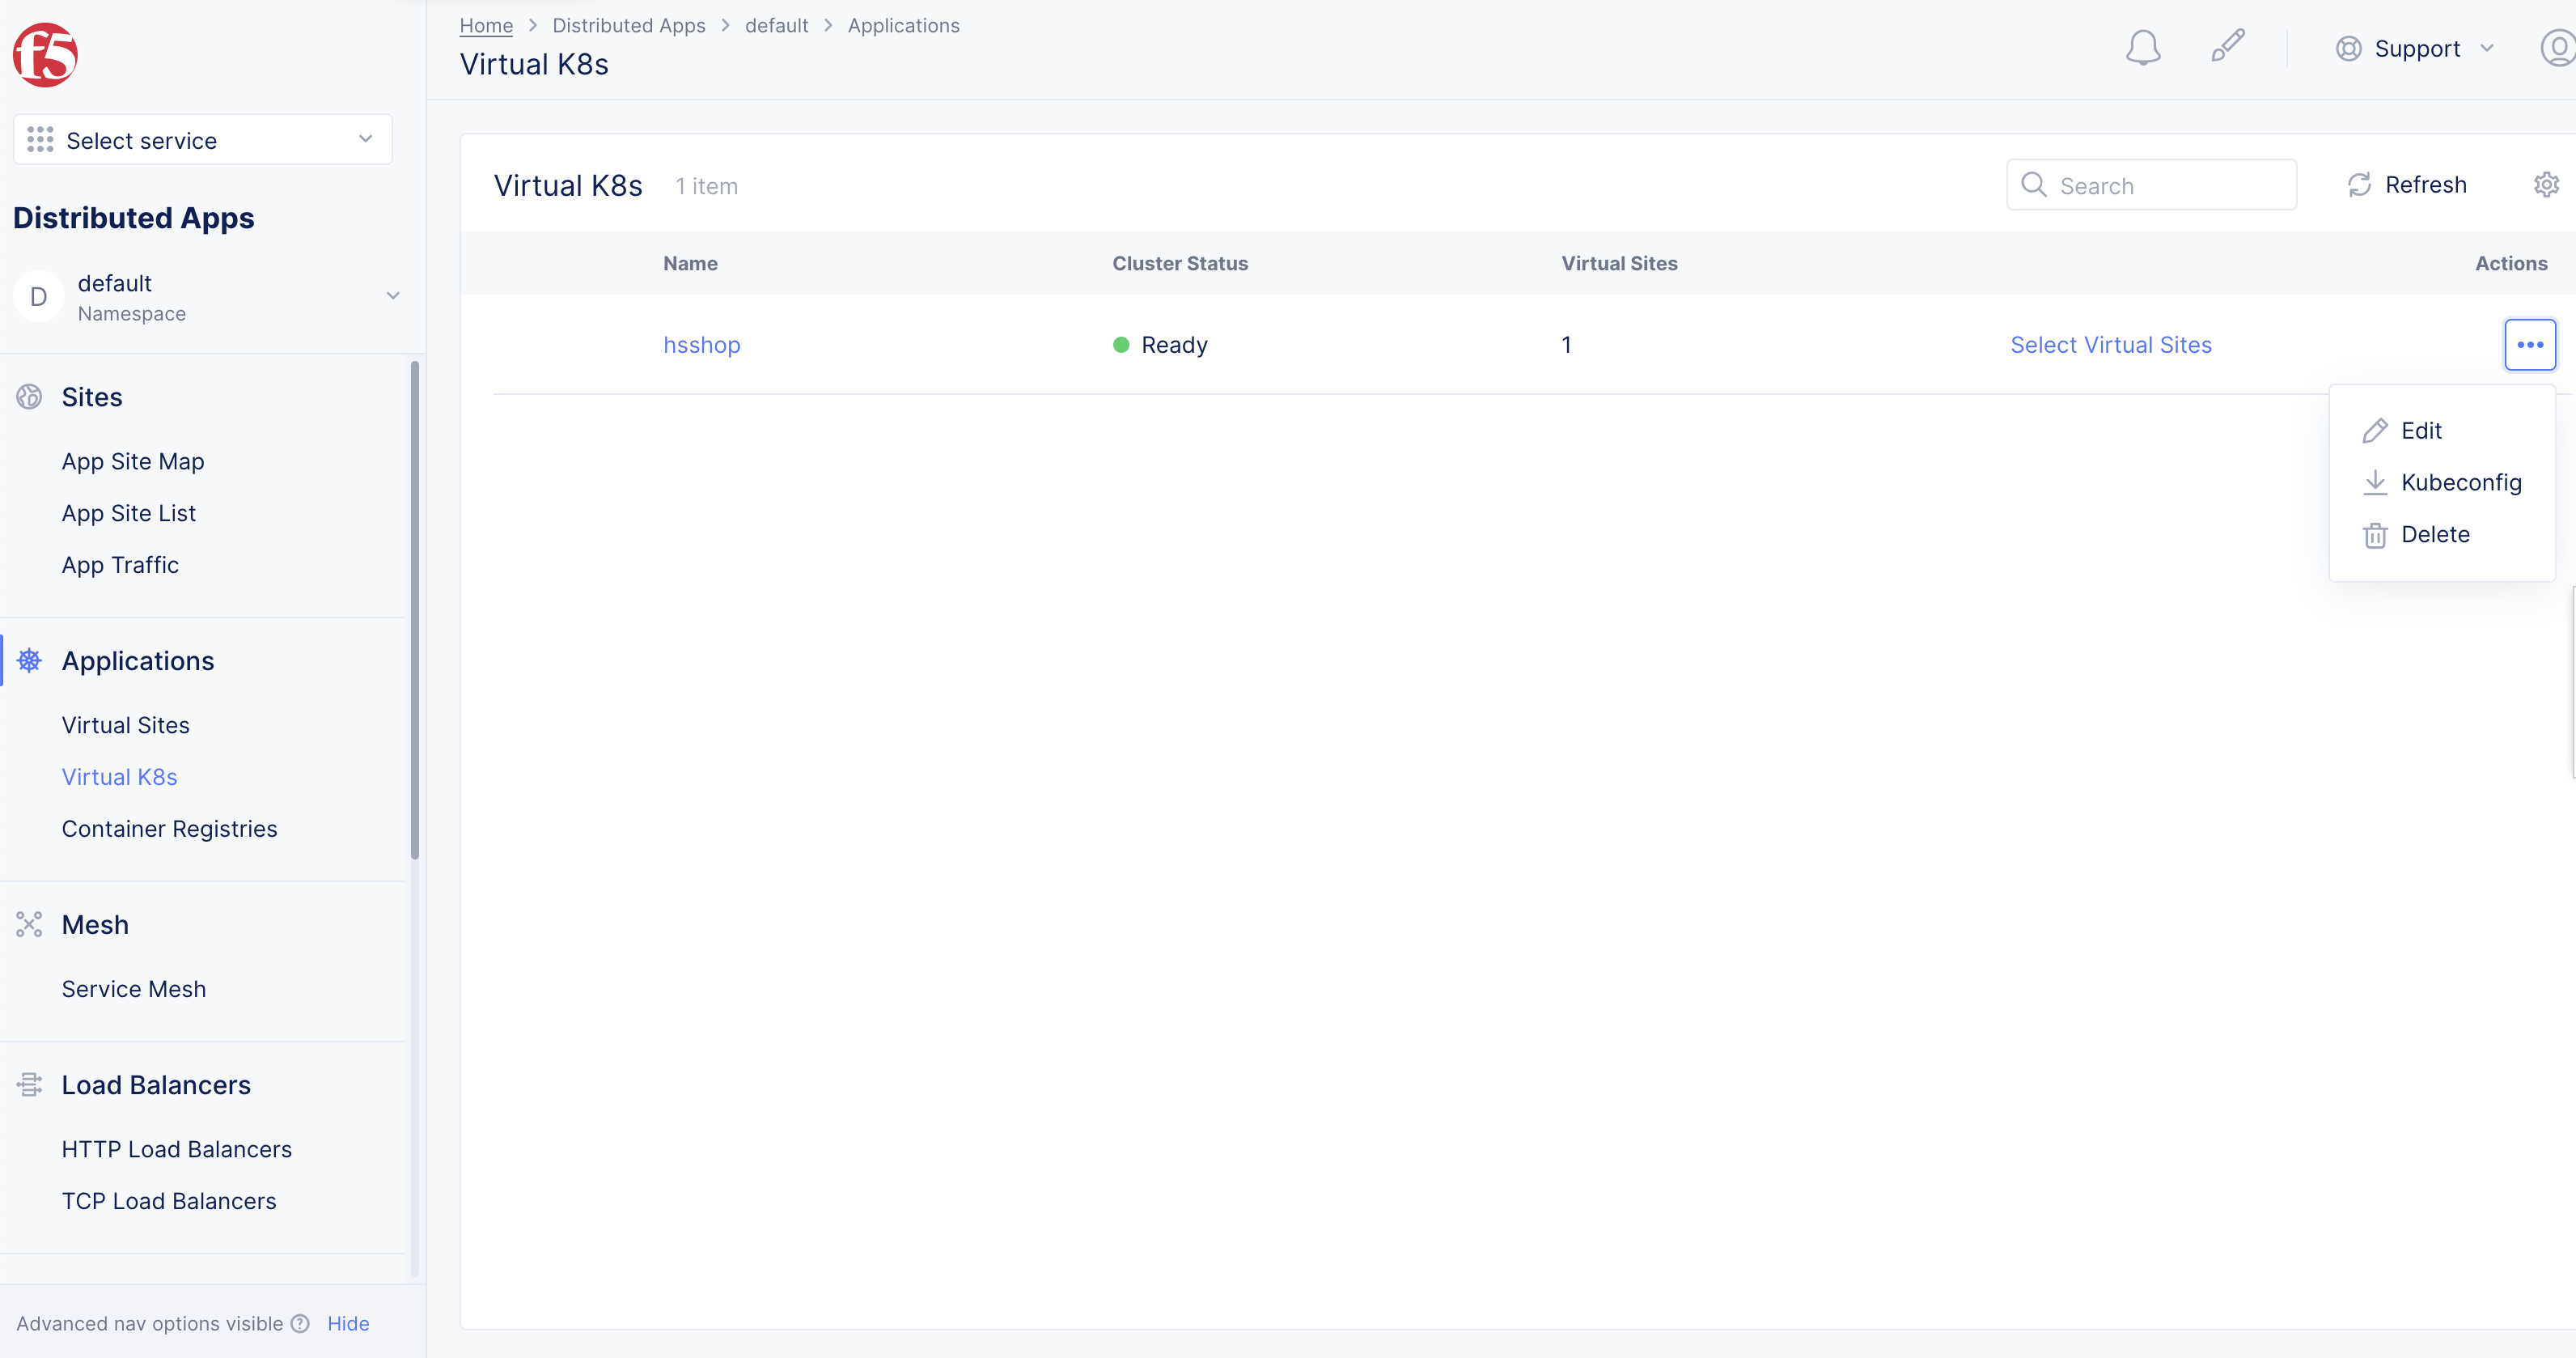
Figure: Kubeconfig for the vK8s Object
Step 4: Create a local PVC configuration file.
Create a PVC configuration file on your local machine in JSON or YAML format.
This example shows a sample application configuration.
Note: You will need to change the sample image name mentioned in the template manifest to the correct image name.
apiVersion: v1kind: PersistentVolumeClaimmetadata: name: pvc-sample-app *# The name of your claim—you’ll need this later when using the claim as the pod’s volume.* namespace: vk8s-pvcspec: accessModes: - ReadWriteOnce *# You want the storage to support a singleclient (performing both reads and writes)* resources: requests: storage: 100Mi *# Requesting 100M of storage* volumeMode: FilesystemStep 5: Create a local deployment configuration file..
Create a deployment configuration file on your local machine in JSON or YAML format.
This example shows a sample application configuration.
Note: You will need to change the sample image name mentioned in the template manifest to the correct image name.
apiVersion: apps/v1kind: Deploymentmetadata: name: pvc-sample-app namespace: vk8s-pvc annotations: ves.io/workload-flavor: mediumspec: replicas: 1 selector: matchLabels: app: pvc-sample-app template: metadata: labels: app: pvc-sample-app spec: containers: - image: pvc-sample name: pvc-sample-app volumeMounts: - name: example-data mountPath: /data/db ports: - containerPort: 27017 protocol: TCP volumes: - name: example-data persistentVolumeClaim: claimName: example-pvc *# Referencing the PersistentVolumeClaim by name in the pod volume*Step 6: Create and export KUBECONFIG.
Create and export KUBECONFIG environment variable using kubeconfig file downloaded in Step 3.
This example uses the kubeconfig file downloaded to the Downloads folder.
export KUBECONFIG=~/Downloads/ves_vk8s-pvc_vk8s1.yamlStep 7: Create PVC and deployment objects.
Create PVC and deployment objects using the configuration files created in Step 4 and Step 5 respectively.
kubectl apply -f pvc.ymlkubectl apply -f deployment.ymlVerify PVC Operation
Creating PVC creates the PV and PVC objects. Creating deployment creates a pod which uses pvc for its storage. You can verify the created objects and access the storage resource to execute operations such as read or write as per the configured access mode.
Step 1: Verify PV information.
Note: You will need to change the sample image name mentioned in the template manifest to the correct image name.
kubectl get pvNAME                                       CAPACITY   ACCESS MODES   RECLAIM POLICY   STATUS   CLAIM                     STORAGECLASS   REASON   AGEpvc-584c4a18-cf6f-4f4d-8f4a-53828ff2d999   1Gi        RWO            Delete           Bound    vk8s-pvc/pvc-sample-app   standard                3m46s
kubectl describe pvName:            pvc-584c4a18-cf6f-4f4d-8f4a-53828ff2d999Labels:          <none>Annotations:     pv.kubernetes.io/bound-by-controller: yes                 pv.kubernetes.io/provisioned-by: kubernetes.io/azure-disk                 volumehelper.VolumeDynamicallyCreatedByKey: azure-disk-dynamic-provisionerFinalizers:      [kubernetes.io/pv-protection]StorageClass:    standardStatus:          BoundClaim:           vk8s-pvc/pvc-sample-appReclaim Policy:  DeleteAccess Modes:    RWOVolumeMode:      FilesystemCapacity:        1GiNode Affinity:   <none>Message:Source:    Type:         AzureDisk (an Azure Data Disk mount on the host and bind mount to the pod)    DiskName:     kubernetes-dynamic-pvc-584c4a18-cf6f-4f4d-8f4a-53828ff2d999    DiskURI:      /subscriptions/f68d94a5-1db7-4954-9a79-02b5711cb0a1/resourceGroups/demo-ce/providers/Microsoft.Compute/disks/kubernetes-dynamic-pvc-584c4a18-cf6f-4f4d-8f4a-53828ff2d999    Kind:         Managed    FSType:    CachingMode:  ReadOnly    ReadOnly:     falseEvents:           <none>
Step 2: Verify PVC information.
kubectl get pvcNAME STATUS VOLUME CAPACITY ACCESS MODES STORAGECLASS AGEpvc-sample-app Bound 4m16skubectl describe pvcName: pvc-sample-appNamespace: vk8s-pvcStorageClass:Status: BoundVolume:Labels: <none>Annotations: <none>Finalizers: [kubernetes.io/pvc-protection]Capacity:Access Modes:VolumeMode: FilesystemMounted By: pvc-sample-bcbf9745-6nkzzEvents: <none>Step 3: Verify deployment and pod status.
kubectl get deploymentNAME READY UP-TO-DATE AVAILABLE AGEpvc-sample 1/1 1 1 25mkubectl get podNAME READY STATUS RESTARTS AGEpvc-sample-bcbf9745-6nkzz 2/2 Running 0 25mStep 4: Access your application.
Access your application using pod information obtained in Step 3.
This example opens the application shell.
Note: You will need to change the sample image name mentioned in the kubectl command to the correct image name.
kubectl exec -it pvc-sample-app-bcbf9745-6nkzz pvc-sampleDefaulting container name to pvc-sample.Use 'kubectl describe pod/pvc-sample-bcbf9745-6nkzz -n vk8s-pvc' to see all of the containers in this pod.pvc-sample shell version v4.2.3connecting to: pvc-sample://127.0.0.1:27017/?compressors=disabled&gssapiServiceName=pvc-sampleImplicit session: session { "id" : UUID("c84807bb-c22b-41c6-9103-6f51f89cd3b2") }pvc-sample server version: 4.2.3Welcome to the pvc-sample shell.For interactive help, type "help".For more comprehensive documentation, see  http://docs.pvc-sample.org/Questions? Try the support group  http://groups.google.com/group/pvc-sample-user...
>
Step 5: Update data to persistent storage.
You can perform database operations to update data to the persistent storage.
This example writes JSON documents to the application.
> use mystoreswitched to db mystore> db.foo.find()> db.foo.insert({name:'foo'})WriteResult({ "nInserted" : 1 })> db.foo.insert({name:'test'})WriteResult({ "nInserted" : 1 })>Verify the records from the pvc-sample shell.
> db.foo.find(){ "_id" : ObjectId("5e7761abf01f2bc511bd6b8a"), "name" : "foo" }{ "_id" : ObjectId("5e7761b5f01f2bc511bd6b8b"), "name" : "test" }>> exitbyeStep 6: Delete and recreate your deployment.
Delete your deployment and recreate the deployment.
kubectl delete -f deployment.ymldeployment.apps "pvc-sample" deleted

kubectl get podsNo resources found in vk8s-pvc namespace.
kubectl apply -f deployment.ymldeployment.apps/pvc-sample created
kubectl get podsNAME READY STATUS RESTARTS AGEpvc-sample-bcbf9745-g6vqv 2/2 Running 0 61sDelete PVC
Step 1: Delete PVC with kubectl.
You can delete PVCs in using the kubectl delete command or from the F5 Console.
- To delete using kubectl, specify the PVC either by file or by name.
kubectl delete -f <file.yaml>kubectl delete pvc <pvc-name>Step 2: Delete PVC in Console.
-
To delete from the F5 Console, change to the namespace where your application is deployed.
-
Select
Applicationsfrom the configuration menu, andVirtual K8sfrom the options pane. -
Select on the vK8s objects and select
PVCstab in the dashboard. -
Select
...>Deletefor your PVC and confirm deletion.
-
Note: If you delete a PVC that is in active use by a pod, the PVC is not removed immediately. PVC removal is postponed until the PVC is no longer actively used by any pods. Also, if an admin deletes a PV that is bound to a PVC, the PV is not removed immediately. PV removal is postponed until the PV is no longer bound to a PVC.